Model & texture a warm arch-viz interior using 3ds Max & Corona Render
- Ankit Sagar

- Jul 20, 2020
- 4 min read
Updated: 7 days ago

Introduction:-
Hello dear friends,My name is Ankit Sagar, and I’m a 3D arch-viz artist based in Ghaziabad, Uttar Pradesh, India. In this post, I’m excited to share the process behind one of my favorite projects—The Redesign. What I love most about this work is its minimalistic style and the elegant color palette that enhances the simplicity of the design.
My goal here is to share the technical insights I gained during the creation of this piece—how to achieve realistic renderings with minimal complications. I hope this helps you learn new techniques and inspires your own creative journey. For this project, I used 3DS Max, Corona Renderer, and Photoshop.
Inspiration:-
The process began with a concept that I visualized in my mind. I then translated those thoughts into a list and a rough sketch on paper. After laying the foundation, I browsed through numerous reference images online to fuel my ideas and help craft a minimalistic draft that emphasized color harmony and balance.
I carefully researched furniture and accessories that would complement the aesthetic I had in mind. These references played a crucial role in shaping the final design and maintaining the visual consistency throughout the project.


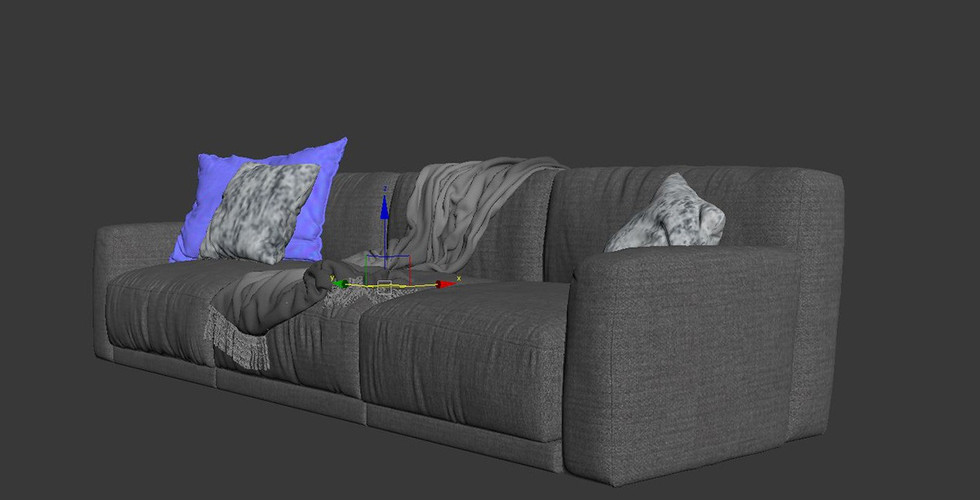
Modeling:-
Modeling plays a crucial role in achieving realism in any architectural visualization. The more detailed the models are, the more lifelike the final render appears.
For this project, I used a combination of high-quality assets and custom models. I downloaded detailed 3D models from trusted sources like 3D Sky, Design Connected, Dimensiva, Evermotion, and Model+Model. These platforms offer professionally made assets that significantly speed up the workflow and enhance visual fidelity.
However, not everything I needed was available online. So, I also modeled several custom pieces myself—such as cabinets, shelves, and walls—ensuring they had proper proportions, accurate dimensions, and fine detailing. This blend of ready-made assets and custom modeling helped maintain both realism and originality in the scene.


Camera:-
Once the modeling was complete, the next important step was setting up the right camera angles. In any visualization, camera placement is absolutely key—it's what defines the composition and how your design is perceived. A poorly chosen angle can ruin even the most beautifully crafted scene.
For this project, I applied the Rule of Thirds, a fundamental principle in photography and visual arts. It’s especially effective for architectural compositions, helping to balance elements and guide the viewer’s eye naturally through the image.
One important suggestion I’d like to share: avoid working with a very low Field of View (FOV), as it can distort the perspective and make the scene feel unrealistic. I generally work with a FOV between 50–75mm (which translates to a focal length of around 23–38mm). This range is ideal for interior shots, offering a natural perspective while preserving depth and
detail.


Lighting:-
Lighting plays a vital role in any type of composition—whether it's an interior or exterior scene. It's one of the key elements that brings life, mood, and realism to your renders.
For this project, I relied on two of my favorite lighting techniques: Corona Sun and HDRI lighting. In this particular case, I used an HDRI from the Peter Guthrie pack, known for its high-quality, realistic lighting environments. To achieve a clean and rich white tone in the scene, I applied color correction with desaturation to the HDRI, which helped balance the overall lighting and maintain a minimal aesthetic.
For additional lighting, especially the ceiling spotlights, I used Corona Disk Lights, which provided a soft and natural falloff perfect for interior accents.
One of the reasons I prefer Corona Renderer over V-Ray is its simplicity—there's no need to tweak dozens of settings to get great results. That said, I still fine-tuned some values in Tone Mapping to enhance the lighting balance and add depth to the scene.


Texturing:-
Texturing plays a critical role in achieving realistic visualizations. Honestly, it’s not always an easy process—but with patience, attention to detail, and consistency, you can reach a high level of realism.
One of the most important aspects of texturing is being extremely mindful of material finishes.
whether it’s wood, metal, glass, stone, or fabric. Each material behaves differently in real life, and replicating those subtle differences is key to making your render believable.
A few important tips I always follow:
Avoid low-resolution textures and highly saturated images—they often break the realism.
Use seamless textures whenever possible to avoid visible repetition patterns.
Don’t use flat reflection values—always incorporate grayscale maps for reflection and roughness to add natural imperfections. These micro-details bring surfaces to life and make them feel more organic.
For this project, I sourced high-quality textures from Arroway, Siger Shaders, and Texture Heaven. These libraries provide professional-grade texture maps that are perfect for achieving photorealistic materials.


Post-Production:-
I prefer to keep post-production minimal. My goal is to achieve the best possible result directly from 3DS Max and Corona Renderer itself. I handle most of the adjustments—such as color correction, white balance, and overall tone mapping—within Corona to maintain full control over the lighting and mood right from the render engine.
However, I do use Photoshop occasionally for some fine-tuning—like adjusting contrast, brightness, or making minor color corrections to specific elements in the scene. But overall, I try to avoid over-editing, as I believe the more you can get right in the 3D workflow, the better and more efficient the final output becomes.


Related Blogs

Bình luận